


Overview
Introduction to The Cloud Resume Challenge
AWS Account with IAM User and AWS Vault Setup
What Is Infrastructure As Code? and What is AWS SAM?
Deploy to S3 using AWS SAM
Deploy HTML & CSS with the AWS SAM
Objective:
The primary goal of the Cloud Resume Challenge is for participants to build a static personal resume website and deploy it using cloud services. The challenge encourages hands-on experience with various cloud technologies, including infrastructure as code (IaC), serverless computing, and storage services.💻
Pre-requisites
Your resume needs to have the AWS Cloud Practitioner certification on it. This is an introductory certification that orients you on the industry-leading AWS cloud – if you have a more advanced AWS cert, that’s fine but not expected.
An AWS account with root privileges
A basic understanding of Amazon S3, Amazon CloudFront, AWS Lambda, Amazon DynamoDB, and Amazon API Gateway
Code editor of your choice
- Introduction to The Cloud Resume Challenge
The Cloud Resume Challenge is a project created by Forrest Brazeal, a well-known advocate for cloud computing and serverless technologies. The challenge is designed to help individuals enhance their cloud skills and showcase their capabilities by creating a personal resume website hosted on a cloud platform of their choice.🚀
Steps to Complete the Challenge:
Create an AWS Account (or choose another cloud provider).
Set up a static resume website.
Implement Infrastructure as Code for cloud resource management.
Deploy the website using cloud services.
Optional: Enhance the website with additional features or dynamic content.🌟
So, Let's jump into the beginning of the challenge by setting up an AWS account
AWS Account with IAM User and AWS Vault Setup
In this step, We will create an IAM user with the necessary permission and Installation of AWS Vault to communicate with AWS Cloud through the command line.
Why do we need an IAM user? - IAM users ensure the principle of least privilege, granting only necessary access for tasks.
Follow the below link to create an IAM user with access keys
What is AWS Vault? - AWS Vault is a tool that securely stores and manages AWS credentials in development environments. It helps protect your AWS credentials from unauthorized access and ensures that only authorized users can access your AWS resources.
Follow the below link to install AWS Vault. It has detailed instructions for installing the AWS Vault.
After successful installation run the following command to store your credentials. It will ask for the Access key ID and Secret access key.
aws-vault add my-user
Enter the value you received while creating an IAM User.
Now run the below command to check if the credential you entered is working or not.
aws-vault exec my-user -- aws s3 ls
You should see the out as following screenshot

Note: It will give an error saying Access denied if you have not configured the IAM Policy correctly. Do check if the IAM policy is configured correctly or not.
So, our AWS account and AWS Vault are ready to start working with AWS from the local environment.
Next, we will use AWS SAM to create an S3 bucket using code.
What Is Infrastructure As Code? and What is AWS SAM?
Infrastructure as Code (IaC) is a practice that involves managing and provisioning computing infrastructure through machine-readable scripts. It treats infrastructure configurations like application code, enabling automation, version control, and reproducibility.
Key aspects of IaC include:
Declarative Configuration: IaC uses declarative language or script files to specify the desired state of the infrastructure. Users declare what resources they want, and the IaC tool determines how to achieve that state.
Automation: IaC allows for the automation of infrastructure provisioning, configuration, and management processes, reducing manual errors and increasing efficiency.
Version Control: IaC scripts can be versioned using version control systems (e.g., Git), enabling tracking changes, collaboration, and rollback to previous states.
Reproducibility: IaC ensures that infrastructure can be reproduced consistently across different environments, from development to production.
Popular IaC tools include Terraform, AWS SAM, AWS CloudFormation, Ansible, and Chef.
We are going to use AWS SAM(Serverless Application Model) provided by AWS.
AWS SAM is an open-source framework for building serverless applications. It extends AWS CloudFormation to provide a simplified way of defining the Amazon API Gateway APIs, AWS Lambda functions, and Amazon DynamoDB tables needed by your serverless application. AWS SAM uses a YAML configuration file to describe the serverless application's architecture and configuration.
Follow the below link which has step-by-step instructions to install AWS SAM on your preferred operating system.
Installing the AWS SAM CLI for Windows, Linux, and macOS
- Deploy to S3 using AWS SAM
Your HTML resume should be deployed online as an Amazon S3 static website. Services like Netlify and GitHub Pages are great and I would normally recommend them for personal static site deployments, but they make things a little too abstract for our purposes here. Use S3.
S3 is a file service on AWS to store the files and it is also really useful to host the static website.
Follow the below steps to initialize SAM in your local system
- Let's go and hit sam init in the command line I am using cmd of Windows.
sam init
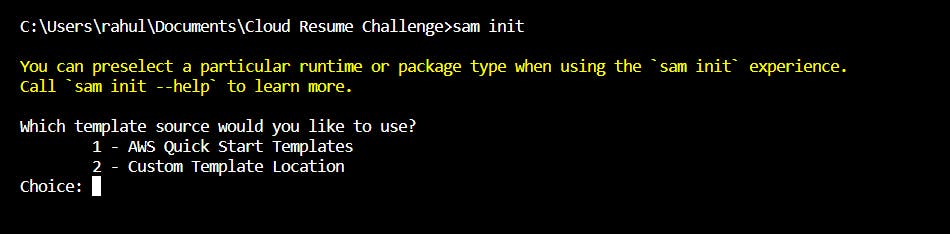
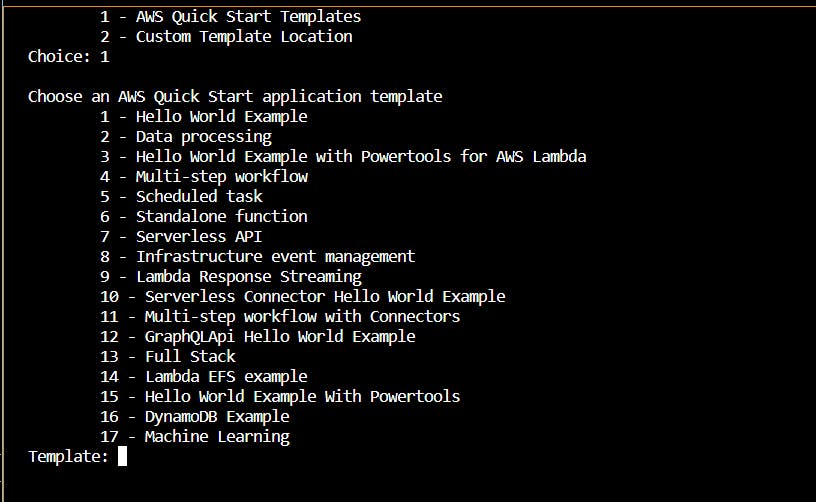
It will ask you to choose the template of your choice, we will go with 1 - AWS Quick Start Template
- Choose an AWS Quick Start application template - 1) Hello World Example
Use the most popular runtime and package type? (Python and zip) [y/N]: y
Would you like to enable X-Ray tracing on the function(s) in your application? [y/N]: N
Would you like to enable monitoring using CloudWatch Application Insights? - N
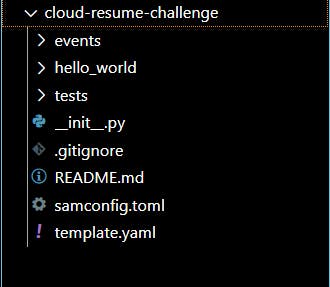
Project name [sam-app]: name of your choice (I am choosing cloud-resume-challenge)
It will clone the repo in your local folder and now in the terminal change the directory to that folder. and you will see the folder structure as below screenshot.
Now run sam build command to build the code so that it can be deployed. After a successful build, you will see the Build Sucess message.
Note: As we have selected Python runtime, it will look for a specific Python version installed in your system. In my case I had Python 12 installed in my system but the SAM template required Python 9 so to resolve that issue, I uninstalled Python 12.
SAM Deploy - Now run the below command
aws-vault exec my-user --no-session -- sam deploy --guided
aws-vault exec my-user: This part of the command is using aws-vault, which is a tool for securely storing and accessing AWS credentials. It allows you to execute commands with temporary AWS credentials without exposing your long-term access key and secret key. In this case, it's using the profile name my-user we created earlier.
--no-session: This flag indicates that the AWS credentials should not be stored in a session. Sessions are temporary sets of credentials with a limited lifespan. By using --no-session, you are ensuring that the credentials are used only for the immediate execution of the command.
sam deploy: Initiates the deployment process for your serverless application.
--guided: This flag starts an interactive guided deployment. During the guided deployment, AWS SAM will prompt you for information needed to deploy your application, such as AWS Region, Stack Name, and other configuration options.
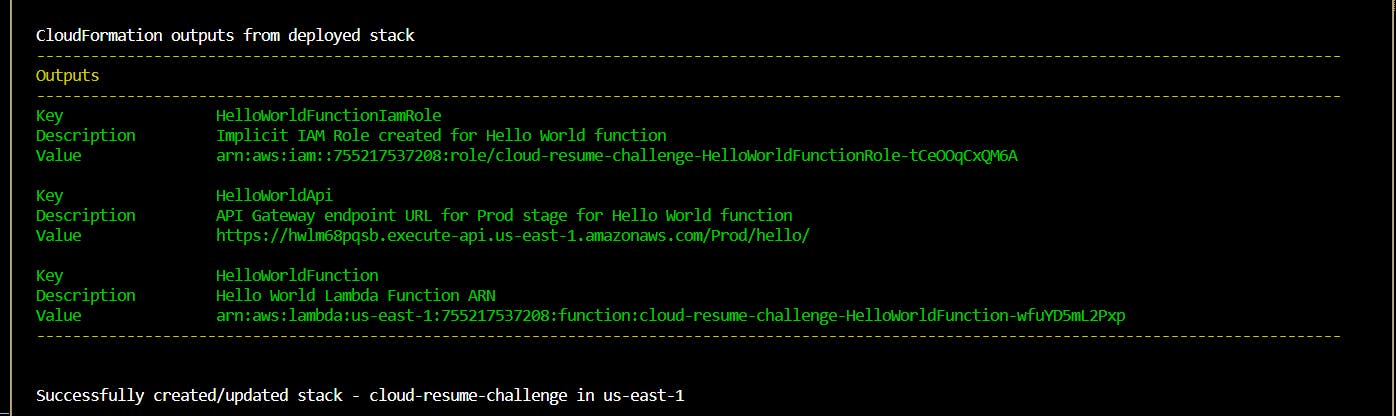
After running the sam deploy command it will ask for some information like stack name and region in which you want to deploy the code.

On Successful Deployment, you will the success message in your terminal.
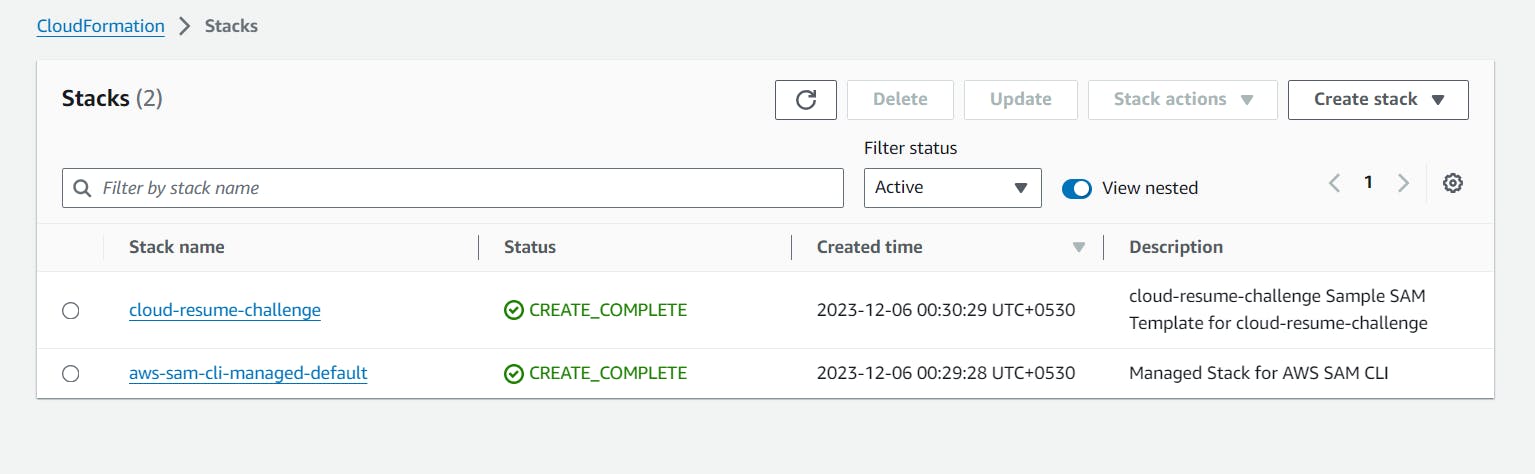
Now Search for CloudFormation in AWS and open it, you will see the stack created for you in CloudFormation. It will store the state of the AWS resources you created. If you are curious then you can just open the stack and look around.
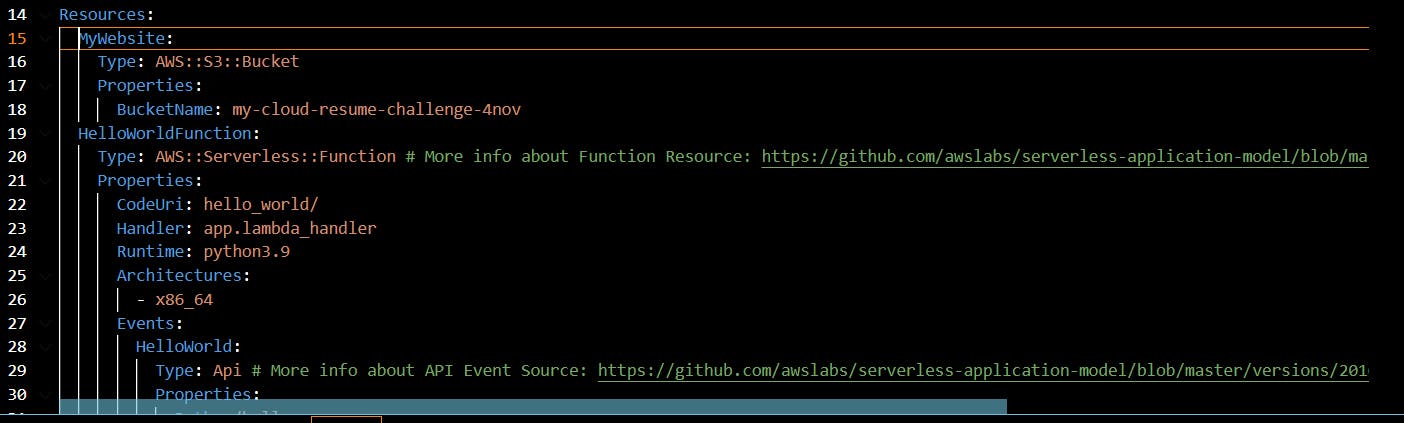
Now I have some snippets to create the bucket in S3. We are going to add that in our code and then we will deploy it to AWS.
 MyWebsite:
    Type: AWS::S3::Bucket
    Properties:
      BucketName: unique-name-of-your-choice
Copy this snippet and paste it into the template.yaml file.
Now again run sam build and sam deploy command but this time run the sam deploy command without --guided Flag. and check if the bucket is created using the AWS console or using the command in the terminal.

Deploy HTML & CSS with the AWS SAM
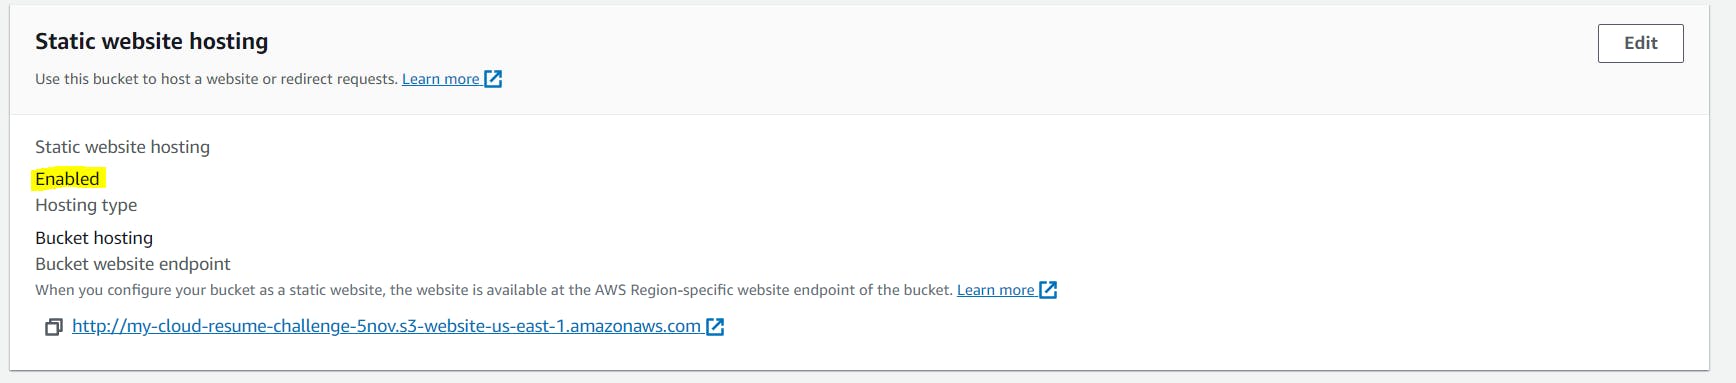
In this step, we are just going to put an HTML file in the bucket we created and enable the static website hosting of the S3 bucket.
Enable static website hosting
Add the AccessControl and WebsiteConfiguration properties in the code, your code should look like the below snippet
 Resources:
   MyWebsite:
     Type: AWS::S3::Bucket
     Properties:
       PublicAccessBlockConfiguration:
         BlockPublicAcls: false
         IgnorePublicAcls: false
         BlockPublicPolicy: false
         RestrictPublicBuckets: false
       WebsiteConfiguration:
         IndexDocument: index.html
       BucketName: my-cloud-resume-challenge-5nov
After adding this run the build and deploy command. Now go to your S3 bucket in the AWS Console. Now check in the Properties tab, at the bottom you will find static website hosting and it should be enabled.
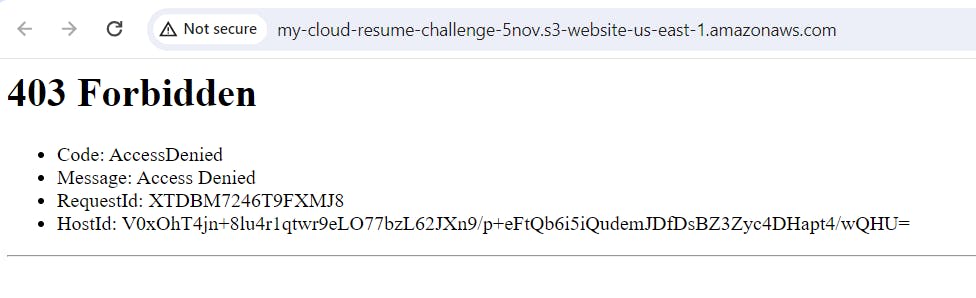
Click on the endpoint you can see in the Static website hosting section. and you will see a 403 error.
Create one folder in your working directory and add index.html file in that folder with some basic content

Now we have a different command to send the file to the S3 bucket.
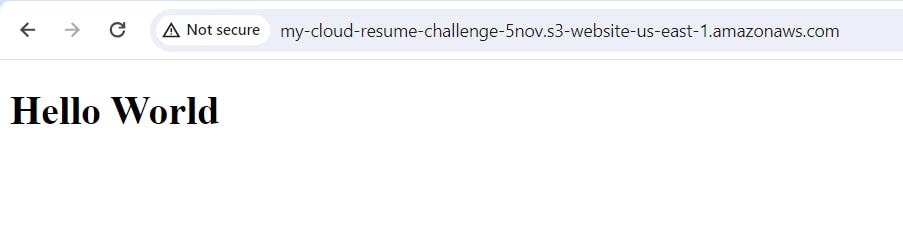
aws-vault exec my-user --no-session -- aws s3 sync ./resume-site s3://my-cloud-resume-challenge-5novTry to access that link and we should be able to see the Hello World message but still the same error message.
We need to add some permission to our bucket and what that does is public read on all the objects within our S3 bucket.
  Resources:
    MyWebsite:
      Type: AWS::S3::Bucket
      Properties:
        AccessControl: PublicRead
        WebsiteConfiguration:
          IndexDocument: index.html
        BucketName: my-cloud-resume-challenge-4nov
    BucketPolicy:
      Type: AWS::S3::BucketPolicy
      Properties:
        PolicyDocument:
          Id: MyPolicy
          Version: 2012-10-17
          Statement:
            - Sid: PublicReadForGetBucketObjects
              Effect: Allow
              Principal: "*"
              Action: "s3:GetObject"
              Resource: !Join
                - ""
                - - "arn:aws:s3:::"
                  - !Ref MyWebsite
                  - /*
        Bucket: !Ref MyWebsite
And there you go, Now you can see the Hello World message.
Congratulations!! You have deployed a static website on S3 using AWS SAM. but it is not over yet. We have a long way to go but that is the end of Part 1.
Here are a few resources that I recommend:
Cloud Resume Challenge's official website - https://cloudresumechallenge.dev/
The tutorial I am following - https://youtube.com/playlist?list=PLEk97Q5Nj5oesA1WNk7DzaUpZUnCsQFVQ&si=KdskFmpZyaUC8S1R
In a nutshell,
This blog post has covered everything you need to know to deploy a static website to AWS S3 using AWS SAM. We've talked about The Cloud Resume Challenge, setting up an AWS account, Infrastructure as Code (IaC), AWS Serverless Application Model (SAM), and even how to deploy static HTML and CSS content to S3 using AWS SAM. Stay tuned for Part 2 and Until then Keep learning.
If this post was helpful, please like this article to show your support.